



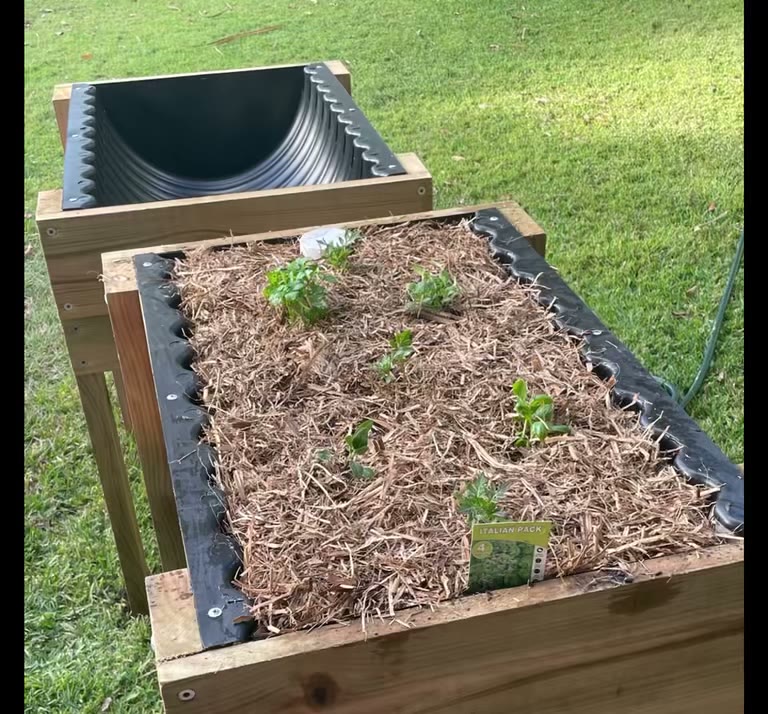
A wicking bed waters your plants from underneath instead of from the top, which means topping up a reservoir once a week instead of dragging a hose out every evening. They are not hard to build, but the details matter — and most guides skip the two that cause the failures.
Brad Grieve built a pair of them in his own Corrogarden beds and filmed the whole thing, so this guide walks through a real build from start to finish: what to buy, how to line it, how to set the overflow, and what to watch for once it is planted.
One rule before you start: the overflow hole must sit no more than 10cm above the base of the tub. Almost everything else in this guide is a preference you can take or leave. That one is not. It is what keeps the weight of the water inside what the bed is built to carry, and it is explained properly at Step 5.
What is a wicking bed?
A wicking bed is a garden bed with a sealed water reservoir underneath the growing mix. The mix draws water upward out of that reservoir through capillary action, so the roots take what they need and the surface stays dry.
Think of a sponge sitting in a shallow dish of water. The sponge slowly pulls up what it needs rather than being drenched from above. That is the whole idea.
Why would you want one?
- You water far less often. A reservoir holds several days of water. In a hot Australian summer, that is the difference between coming home to a garden and coming home to a compost heap.
- Moisture stays consistent. Plants draw water steadily instead of swinging between soaked and bone dry, which is what causes split tomatoes and bolted lettuce.
- The leaves stay dry. Watering from below keeps water off the foliage, and dry leaves mean far less mildew and fungal trouble in humid weather.
- Less is lost to evaporation. Water from the top and you wet the whole surface — on a hot or windy day a fair share of that leaves the soil before the roots ever see it. A wicking bed delivers from underneath, so the surface stays dry and that particular loss largely does not happen. What does leave the bed goes out through the plants, which is what you were watering for.
- Nothing in it can break. No timer, no batteries, no pump, no power. That is a real advantage over every automated alternative, all of which have something in them that fails quietly while your back is turned.
The limits, plainly. Wicking suits thirsty plants — tomatoes, leafy greens, cucumbers, silverbeet. Mediterranean herbs like rosemary, thyme and oregano want to dry out between drinks and will sulk in a permanently moist bed. The reservoir is also finite: it carries a bed a week or two and then it is empty, so it is not the answer for a long trip away — for that you want a tap timer, which is plumbed to mains and never runs out. And a wicking bed is a build, not a purchase: if you simply want to water less often, an automatic drip system on a timer gets you there in about twenty minutes for less money. Build the wicking bed because you want to, not because it is the only option. Weighing it up? Here are all three ways to make a bed water itself, side by side.
How much water does the reservoir hold?
On a full-length 157cm bed with the overflow set at 10cm, the reservoir holds somewhere around 15 to 20 litres of water once the stone is packed in — two watering cans, near enough. Our compact 81cm bed is the same shape at half the length, so it holds about half that. The exact figure depends on your fill: packed stone leaves roughly 40% of the space open for water.
In practice that makes it a top-up-weekly system rather than a fill-it-and-forget-it-for-a-month one. Through a hot spell a well-planted bed will drink it noticeably faster; through winter it will barely touch it. The fill pipe doubles as your gauge — if you can see water in the pipe, there is water in the reservoir.
Weight is worth knowing too, because it is exactly why the 10cm limit exists. Water and stone together come to somewhere near 40kg, against roughly 30kg for the potting mix that space would otherwise hold — so a properly built reservoir adds only about 10kg to the bed. Let the water climb higher and that changes fast, because the tub is widest at the top: by 25cm the volume has more than tripled. Ten centimetres is a generous working limit, not a stingy one.
What should you use for a wicking bed liner?
The liner is what turns an ordinary bed into a wicking bed, and it is the part people most often get wrong. Its job is simple: hold water at the base without leaking, and survive being buried under a few hundred kilos of wet potting mix for years.
- Pond liner is the best choice. It is thick, flexible, UV-stable and designed to hold water permanently. It costs more than the alternatives and it is worth it, because replacing a failed liner means emptying the entire bed.
- Heavy builder's plastic works. Use the thickest black plastic you can find. It is what Brad used and it does the job, but it is easier to puncture with a shovel or a sharp stone, so lay it carefully and press it flat into the base.
- Skip thin painter's drop sheet. It will not survive the fill, let alone a season.
- You need geotextile as well, not instead. The liner holds the water; a geotextile drainage membrane sits on top of the reservoir and stops potting mix washing down into it. Without that membrane the reservoir silts up within a couple of seasons and there is no way to clean it out once the bed is planted.
Fit the liner so it sits flat against the base with as few wrinkles as possible. A wrinkle that traps a void will show up later as a soft spot in the bed.
What else do you need?

| Item | What it does | What to buy |
| Slotted ag-pipe (65mm or 100mm) | The reservoir spine — holds an open channel of water along the base | Polypropylene or HDPE, already slotted. See the materials note below. |
| Vertical fill pipe + elbow | Your filling point, and your water gauge | Same material as the ag-pipe where you can |
| Geotextile drainage membrane | Stops potting mix washing down into the reservoir | A roll from any hardware store — Brad used Pillar brand |
| Pond liner or heavy builder's plastic | Seals the base so the reservoir holds water | See the liner section above |
| Scoria (first choice), or gravel / blue metal | Fills the reservoir void so the base does not collapse | Inert stone only — not mulch, not perlite. The reasons are at Step 4. |
| Premium potting mix | The growing layer that does the actual wicking | Premium mix, not garden soil — see our filling guide |
Is PVC safe to use in a food garden?
Worth getting right, because there is a real difference between products that sit side by side on the shelf.
- Rigid PVC pressure pipe is fine. It is what carries drinking water to your house. Rigid pipe is rigid precisely because it contains no plasticiser, and buried in a reservoir it sits in the dark at ambient temperature — the gentlest possible life for a plastic. If you want it in writing, look for pipe certified to AS/NZS 4020, the Australian standard for products in contact with drinking water.
- Grey electrical conduit is the one to skip. Cheap, same shape, same aisle — and a lot of online builds reach for it. It is simply not manufactured to any water-contact standard, so what goes into it is not controlled the way pressure pipe is.
- Skip soft or clear flexible tubing. Flexible vinyl is soft because it is loaded with plasticisers. Anything bendy and see-through is the wrong choice here.
Our pick: slotted ag-pipe. Polypropylene, cheaper than pressure pipe, and it comes pre-slotted — which deletes an entire step, because you do not have to drill it.
Will this work in a raised bed like mine?
Almost any contained bed can be converted, as long as you can seal the base and put an overflow through the wall within 10cm of it. What changes is how much work that takes.
Brad did his in a Corrogarden raised bed, which is worth explaining because it shows the trade-off clearly. A Corrogarden tub is built to drain freely — a corrugated polypropylene trough with slots and holes so water runs straight out and air reaches the roots. That free drainage is the reason the mix stays loose and the roots stay healthy.
A wicking bed does the opposite on purpose. You seal that base, hold water in it deliberately, and set a fixed level for it to sit at. Both approaches grow excellent food — they are different tools, and the point is to choose deliberately rather than by accident.
How do you build it? Step by step
Here is Brad's entire build in forty seconds. The captions are his own. It is worth watching once before you start — the written steps below fill in the detail, and flag the one material we would change.

Step 1: Make the reservoir pipe
Run your ag-pipe along the length of the bed and fit a vertical fill pipe at one end so you have something to pour water into. That standpipe should finish above the final mix level so you can still find it once the bed is planted.

Step 2: Wrap the pipe in geotextile
Sleeve the pipe in geotextile and tape or tie it closed. This is the step people skip and regret, for the reason covered in the liner section — mix migrates in, the reservoir silts up, and you cannot get it back out.

Step 3: Line the base
Lay your liner into the bed and press it into the base so it sits flat. This is what turns a free-draining bed into a sealed reservoir. Take your time — this is the one part you cannot fix later without emptying everything.
Step 4: Fill the reservoir with stone
Pack scoria, gravel or blue metal around the pipe until the base is full to your water line. It holds the shape of the reservoir under the weight of wet mix above, while leaving plenty of open space between the stones for water to move. Scoria is the pick if you can get it: it is inert, its rough surface locks the stack together, and it is noticeably lighter than gravel or blue metal — which matters when the whole point of the 10cm rule is keeping weight sensible.
Everything that lives permanently under the water should be inert — and this is the one change we would make to Brad's build. He used a bagged garden mulch, which is what a lot of online guides suggest, and it is the single thing we would do differently. Anything organic sitting permanently underwater breaks down without oxygen: it slumps, so the reservoir loses volume and the bed sinks; it sours the water; and as it breaks down the fine particles migrate into the ag-pipe and the geotextile and block them. Stone does none of that, because there is nothing in it to rot.
Not perlite either, though it is inert and the question comes up often. Perlite floats, so in a permanently flooded reservoir it works its way upward instead of staying where you put it, and it crushes under a few hundred kilos of wet mix. Perlite earns its place in the potting mix above, not in the reservoir.
This can look like it contradicts other advice you have read, so it is worth being clear: woody material in the base of a normal, free-draining bed is fine and quite common — air gets to it, it rots down slowly and feeds the bed. A sealed reservoir is the opposite situation, and that is what changes the answer. If you have already built one with mulch in it, it is not a disaster — just expect the bed to settle over the first season or two and top the mix up as it does.

Step 5: Set your water level — 10cm, no higher
Decide how deep the reservoir will be — the top of your stone layer is your water line. Everything above it is growing mix; everything below holds water.
Measure up from the base of the tub. Your overflow goes in at 10cm or lower. Never higher. This is the one instruction in this guide that is not a matter of taste. Water weighs a kilo a litre, and unlike potting mix — which drains, settles and lightens between waterings — a reservoir is a standing load pressing outward on the walls every hour of every day. Kept to 10cm, water and stone together come to around 40kg, against roughly 30kg for the mix that space would otherwise hold. Let it climb and the volume more than triples by 25cm, because the tub is widest at the top.
The 10cm cap applies no matter how deep your tub is. A deeper tub does not earn you a deeper reservoir — it earns you more growing mix sitting above the same 10cm of water, which is exactly what you want anyway. Our 41cm tub makes a very good wicking bed for that reason. What the extra depth does not do is license a deeper reservoir.

Step 6: Drill the overflow
This is the one part of the build you cannot undo, so read the overflow section below before you pick up the drill.

Step 7: Cover with geotextile
Lay a second layer of geotextile over the whole reservoir, wall to wall. This is the membrane separating water below from mix above, and it is what the water wicks up through.

Step 8: Fill the reservoir and test it
Before you commit a bed's worth of potting mix, pour water down the fill pipe and watch. You want two things: water appearing at the overflow when the reservoir is full, and dampness spreading across the geotextile. This is also your chance to measure what it actually holds — fill it with a marked bucket and you will know your own bed's number exactly.

Brad's photo of that moment says it better than we can. The dark patch spreading across the white membrane is the reservoir wicking upward, exactly as intended.

Step 9: Fill, plant, mulch
Top up with premium potting mix, plant out, and water the surface by hand for the first two or three weeks. Seedlings have short roots that cannot reach the reservoir yet, so they need normal watering until they grow down into the system. Finish with a good layer of mulch on top — on top is exactly where mulch belongs.


The overflow hole — every wicking bed needs one
This is not an optional refinement, and there is no version of a wicking bed that works without it. With no way out, the first heavy downpour fills the reservoir straight past your water line, drowns the root zone and turns the base sour. With an overflow, the bed regulates itself and the excess simply runs away.
Drill it through the liner and the bed wall, no more than 10cm above the inside floor of the tub. Measure up from the floor, mark your line, then drill. One hole at one end does the job; two, one at each end, is tidier on a full-length bed. Site it so the water runs clear of the timber rather than down a leg.
Do not use the drainage holes the bed already has. It is tempting, because it saves drilling — but on our own 41cm tub those side holes sit well above the 10cm line. Because the tub is widest at the top, filling to meet them would hold several times more water than the bed should carry. If a factory hole happens to fall at or below 10cm, by all means use it. If it does not, drill your own lower down. Never raise the water to meet a hole.
Two things to know before you start: the hole is permanent, and you cannot take it back if you later want the bed to drain normally again. And it is a modification — so if your bed is still under warranty, have a word with the manufacturer first, so there are no surprises either way.
Can you do this to a bed on wheels?
Yes, and the weight is not what should stop you. Packed with stone and capped at 10cm, the reservoir adds only around 10kg over the potting mix that space would otherwise hold. Our wheeled beds sit on 100mm castors rated far beyond that, so a correctly built wicking conversion does not trouble them.
What you give up is the ability to move it. A full wicking bed is not something to roll around the yard: the water shifts as it goes, and the whole point of the reservoir is that it stays put and stays full. If you need to reposition one, let the reservoir run dry first, then move it. Treat the wheels as how the bed gets into position on day one, rather than as an everyday feature — and if rolling the bed about is the reason you bought it, a drip system on a timer keeps that flexibility and still solves the watering.
What should you know before you start?
- The overflow goes no higher than 10cm above the base. The one rule worth repeating, because it is the one that protects the bed. A reservoir is a constant outward load on walls built to hold draining potting mix. It also wicks every bit as well as anything deeper, because the mix does the lifting.
- Everything in the reservoir should be inert. Stone only — organic material rots without oxygen, collapses, sours the water and clogs the pipe, and perlite floats. Scoria, gravel or blue metal do none of that.
- A full bed is heavy and it is staying put. Between water, stone, wet mix and mulch there is a lot of weight in a finished wicking bed. Put it exactly where you want it and get it level before you fill anything, because you will not be nudging it afterwards.
- Level matters more than usual. A bed on a slope drains its reservoir to the low end and leaves the high end dry. Use a spirit level, not your eye.
- Keep watering from the top at first. Seedlings cannot reach the reservoir until their roots grow down. Water normally for the first few weeks, then let the system take over.
- Check the overflow occasionally. It is the pressure release valve for the whole bed, and a blocked overflow after heavy rain is the one failure worth watching for.
- Use premium potting mix, not garden soil. Garden soil compacts in a contained bed and wicks poorly. Our filling guide covers the layers.
Not sure a wicking build is for you?
If you simply want to water less often, our Drip Watering System with Timer gets you there in about twenty minutes, with no modification to your bed at all. A weeper hose loops through the mix, a two-dial timer runs off your garden tap, and multiple beds run off the one timer — here is how to set one up.
No garden tap at all? There is a third option: catch the bed's own run-off and let a solar pump send it back up, with no tap and no power point. All three are compared side by side in three ways to make a raised garden bed water itself.
And if you build one of these, send us a photo. This guide exists because Brad sent us his.
Build, photos and video by Brad Grieve of EDGE Property Maintenance, Moreton Bay — shared with his permission, and with thanks.
More garden guides: three ways to make a bed water itself · why drainage matters · what is drain matting? · build a DIY poly tunnel · how deep should your bed be?
What should I plant right now? Our free garden calendar shows what suits your postcode this month — and which pests to watch for. Ready to grow? Browse our raised garden beds or design yours with the garden bed builder.